So many yeast's so little time!!


So many yeast’s so little time! I recently came across a friend’s complaint about her bread not rising and this made me question the world of yeast. Wow did I get even more confused after reading up on all of them! There are so many different types of yeast that often make it difficult for a newbie baker to figure out. There is active, live, fresh, instant, cake, bread machine…..confused yet? It gets even more confusing…. Bread machine is the same as active. What’s the difference between active and instant you ask? Well instant is more potent and can be mixed in with dry ingredients (I love using this because I never have problems with my dough’s rising!) where as active needs to be mixed in with a little warm water to activate it and also note that yeast can go bad so if you’re using active make sure it is alive! So what about this fresh yeast? Well that is what professional bakers tend to use and if you happen to encounter a recipe calling for this you can use calculate the weight by 3 to figure out how much instant yeast to use!  So what is cake yeast? Well cake yeast and fresh yeast are the same yeast and can be found in the refrigerated area in the grocery store! Are you more confused or less confused? It can get really confusing and what’s even more frustrating is that not all companies label them the same so one company could list active yeast as bread machine or rapid rise making it a little confusing for a new baker!
So you have figured out the yeast you need and now you need to activate it… how do you do this? To proof active yeast, sprinkle the yeast over warm water (105-115 degrees F) and a pinch of sugar, and let it stand for 10 minutes until creamy and bubbly if it doesn’t become bubbly this means your yeast is dead and you need to try with a different packet!!
Fresh yeast should be proofed in tepid water (80-90 degrees F) without contact with salt or sugar. This yeast type is a good choice for breads requiring a long cool rise, or for breads made using the sponge method. Just a reminder that fresh yeast won’t last more than 2 weeks and should be pale gray-brown, fragrant, soft and crumbly not hard, dark brown, or crusty!!!!

Finally I want to discuss one last yeast which is starter or wild yeast. Before yeast was available in grocery stores, bakers kept colonies of yeast for making bread. These colonies were known as starters, and were sometimes passed on from generation to generation. You can make your own starter using commercial yeast, by using potato water (from boiled potatoes) to attract and feed wild yeasts present in the air around us, or by using the yeast found on the skins of organic grapes or organic raisins. Keep the starter in a one-quart crock, jar, or airtight container. I want to include a link on how to make your own starter yeast from grapes so you have the knowledge! I hope this helped you figure out the world of yeast more then it confused you! Happy eating my friends!


http://allrecipes.com/Recipe/Wild-Grape-Starter/Detail.aspx

Gooey Delicious Cinnamon Rolls


Gooey Cinnamon Rolls
Dough:
1 cup whole milk
3 tablespoons unsalted butter
3 1/2 cups (or more) unbleached all purpose flour, divided
1/2 cup sugar
1 large egg
2 1/4 teaspoons rapid-rise or instant yeast (from 1 envelope yeast)
1 teaspoon salt
Nonstick vegetable oil spray

Combine milk and butter in glass measuring cup. Microwave on high until butter melts and mixture is just warmed to 120°F to 130°F, about 30 to 45 seconds. Pour into bowl of stand mixer fitted with paddle attachment.If you dont have a stand mixer you can do this dough by hand, it will just take awhile and may tire you out but dont worry these rolls are worth it! Add 1 cup flour, sugar, egg, yeast, and salt. Beat on low speed 3 minutes, stopping occasionally to scrape down sides of bowl. Add additional 2 1/2 cups flour. Beat on low until flour is absorbed and dough is sticky, scraping down sides of bowl. If dough is very sticky, add more flour by tablespoonfuls until dough begins to form ball and pulls away from sides of bowl. Turn dough out onto lightly floured work surface. Knead until smooth and elastic, adding more flour if sticky, about 8 minutes. Form into ball.
Lightly oil large bowl with nonstick spray. Transfer dough to bowl, turning to coat. Cover bowl with plastic wrap, then kitchen towel. Let dough rise in warm draft-free area until doubled in volume, about 2 hours.

Filling:

3/4 cup (packed) golden brown sugar
2 tablespoons ground cinnamon
1/4 cup (1/2 stick) unsalted butter, at room temperature
Pinch of salt

Roll the dough out on a floured work space till its a rectangle 15x11 and then spread butter over the top. Next you sprinkle the filling mixture over the top and slowly begin rolling it up so you have a long tube! After you have rolled it up you need to trim both ends so its universal. The next thing you need to do is cut the dough in equal parts. a tip for this is to get either no flavored dental floss or some NEVER used fishing line. You really want to make sure that its clean! Then you slice down with this. If you have a wonderful knife then use it but this trick always works well for me! The next thing you will do is get two 8 inch glass pans and spray them so your awesome rolls dont stick! Cover them with plastic wrap than cover them with a kitchen towel. Put them in a warm draft free area and let them rise to double their size. You really really really dont want to skip the double rising part! This may take 40 to 45 minutes or even longer but dont skip this part!
preheat the oven to 375 degrees and put these on the middle oven rack for 20 minutes or until the tops are a beautiful goldne brown. Next let them cool for 10 minutes. I made the mistake of not waiting for them to cool as you can see in my picture! Still great but will be better if its cooled!


Glaze:
4 ounces cream cheese, at room temperature
1 cup powdered sugar
1/4 cup (1/2 stick) unsalted butter, room temperature
          1/2 teaspoon vanilla extract

Mix the ingredients in a medium mixing bowl until well incorporated. Spread this over the tops of your cinnamon rolls and enjoy! I tried to not eat to many but you will find yourself eating more then one!!


Apple Tart Happiness


Apple Tart
Crust:
1 1/4 cups all purpose flour
1 Tbsp sugar
1 Tsp baking powder
1/2 Tsp salt
1/2 cup cubed butter
1 egg lightly beaten
2 Tbsp milk
In a large bowl mix the flour, sugar, baking powder and salt. Cut in the butter until the mixture resembles fine crumbles! If you dont have a butter cutter you can use two butter knifes or large serving forks to cut in the butter! Combine the egg and milk into the flour mixture until well blended. Preheat oven to 350 degrees. Press dough into the bottom and sides of an 11 inch tart pan with a removable bottom! You can find these at any store that has cookware. You can try this in ridge pie pan but it may stick and not come out as nicely as it would if you where using the proper tart pan!
Apples:
6 medium to large Granny Smith apples.
Peel them and slice them. If you want you can add about a tsp of lemon juice and this will stop it from browning! Arrange the apples in a nice fashion over the crust. You can have alot of fun with this part so get creative and just have fun!
Topping:
1/3 to 1/2 cup sugar
2 Tbsp of butter
1/2 Tsp ground cinnamon
1/2 Tsp ground nutmeg
1- 1/2 Tbsp all purpose flour
Combine all ingredients until crumbles form. Sprinkle the crumbles over the apples and bake for 50-60 minutes or until apples are tender. Serves about 12 people. I would recommend some really good vanilla ice cream to go along with this! Enjoy!!

Snowman Cupcakes


Frosting ingredients
1 cup sugar
1/3 water
1/4 tsp cream of tartar
2 egg whites
1 tsp vanilla extract
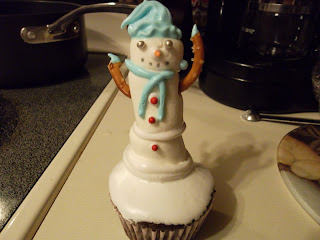
Today I made my snow man cupcakes. Cupcakes seem so mundane but their really not! You can  spruce them up with a different frosting. That is what I did tonight. I used a frosting that reminds me some what of divinity. It has a hard texture but soft melt in your mouth taste. It also has this incredible shine that keeps the whole time. I love it! I cant wait to try it on some other things. Back to the snow man. First I made my favorite batter for the cupcakes then I let them cool for about 40 minutes. Then I begin making the frosting. I enjoyed the recipe alot its rather easy! Its 1 cup sugar, 1/3 water, 1/4 tsp cream of tartar, 2 egg whites and 1 tsp vanilla... you mix the sugar, water, and cream of tartar in a sauce pan and heat until bubbly then you beat your eggs and vanilla till you have soft peaks. Next you gradually add in the sugar mixture into the egg whites....you do this gradually so that you don't scramble the eggs! So add a little and incorporate completely so the egg whites slowly heat up and not scramble! So you do this then you beat the heck out of it until you have firm peaks....around 7 to 10 minutes...it varies. After the frosting in done you take your cupcakes and dip it into the frosting...yes dip it in! This is how awesome this frosting is! Then you have this beautiful cupcake ready for decorations! I went the snow man route and I used marshmallows. I used pretzels to make my reindeer antlers and for the snow man arms. You can alter this to your own liking. I love light blue as a Christmas color and that's why I went blue but you could do red for sure! I hope you all enjoy this and I hope it inspires you to do some baking!! Happy baking my fellow readers!!

Baking away, intro of myself


     Hello everyone, my name is Chasity. I love to cook though I will be the first to admit that not everything I do turns out! In fact I tend to have a lot of disasters but along the way I learn new recipes and I learn what not to do! These are some recipes I want to share with you that have turned out. Occasionally I will post a blog or two about the disasters! Especially if they are miserable fails. If you cant laugh and cry in the kitchen you just are not loving the cooking your doing. I put a lot of love into the food I make so I do shed a tear when it fails!

      I have committed myself to baking new recipes every chance I get and to try new cooking recipes. I am a mother of two wonderful girls with a little one on the way! I want to be a better cook so they have good foods to enjoy that are not over processed and laced with ridiculous amounts of sugars that take away from the goodness! I love making memories with my children and cooking and baking together is something we love to do. I am not great at all cooking but I am not going to give up till I have reached a level that I love. I hope you enjoy these blogs as much as I enjoy making the recipes and writing about them! In a few short months I will also have this blog linked up with my YouTube page where I plan on uploading videos to some of the blogs! Happy reading and eating my fellow foodies!